You'll recall from the last installment of this occasional series that before starting any actual modelling we needed to do the research. With that done, we can now start modelling
Triceratops in earnest.
I use
Cinema 4D for all my 3D work but the techniques I use are common to most major 3D modellers, with one notable exception, the mighty
ZBrush which we'll cover later in the series. How you set up your production pipeline is personal to each individual and company, but mine is as follows:
Basic Modelling:
Cinema 4D
Refinement and adding detail to model:
ZBrush
Texturing:
Bodypaint, ZBrush, Photoshop
Rigging:
Cinema 4D
Animation:
Cinema 4D
Rendering: (you guessed it!)
Cinema 4D Advanced Renderer
Post production and compositing:
Adobe After Effects
Before starting modelling I set up Cinema 4D (c4d) so I can model without having to stop and fiddle with lights etc along the way. So I create a basic matt pale grey texture, construct a standard 3-light setup (I actually have a master file I can import these elements from each time I start modelling) and finally add a floor for the model to stand on.
I then import any images I am going to use as reference for the model. This could be sketches, photos etc but in this case it's the skeletal
Scott Hartman kindly gave me permission to use. I set this up in one of the views (in this case front) and use this as a guide to the proportions of my model.
Figure 1: The modelling environment; now all I need is a dinosaur to go in here . . .
Now we can start modelling. Luckily for us 3D modellers tetrapods display bilateral symmetry, which means they are they have the same layout on either side of the sagittal plane (see fig. 2). We too can use the sagittal plane as the axis for generating the mesh that will make up our model.
Human anatomical planes. As humans and dinosaurs are both tetrapods we can use
this scheme to assist in modelling our Triceratops. From here and used under Creative Commons Licence.
To do this I use a symmetry object in c4d. This means any geometry created or modified is reflected along the chosen axis to create a whole model. By positioning a cube primitive with one side along this plane we can model one side of the dinosaur and the other side will be created automatically. Figures 3 and 4 show how this works.
Figure 3: A cube primitive aligned along the X-axis in c4d. The polygon against the axis
has been removed to make sure hypernurbs work correctly.
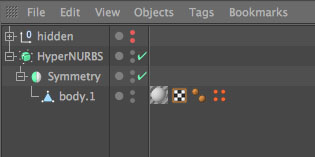
Figure 4: Drop the cube into a symmetry object, adjust the mirror plane to XY and viola!
Finally, the symmetry object containing the cube is dropped into a hypernurbs object, which automatically subdivides the geometry interactively to create organic forms; points and polygons can be weighted to adjust the influence the hypernurbs object has on the mesh.
Figure 5: The basic cube shifted so one edge aligns with the XY axis, dropped in a symmetry object
which is then dropped into a hypernurbs object.
Figure 6: The hierarchy of the basic starting mesh.
The hypernurbs and symmetry object can be turned off and on to help with modelling and previewing and you'll find yourself doing this constantly as the model progresses.
The technique I use for modelling is very simple. Extrude a polygon, adjust the points, extrude another and so on. Starting from this five-sided cube (remember we deleted the poly that is flush to the sagittal plane) we can create any shape we want. In the case of virtually all models including our dinosaur we want to rough out the body shape before we start getting to involved in detail. This basic rule of thumb, start simple and refine down gradually, and this needs some careful forward planning. Our dinosaur is basically one large, complicated shape and our mesh will end up as one large, complicated shape too. So we don't get lost, we need to pay close attention to the anatomy of our subject. We need to allow for the head and it's appendages, the limbs and their morphology and such details as the number of toes, the shape of the tail and so on. Where do the legs join onto the body? How does the neck articulate? How does the tail move? Think of these things before you start and the whole mesh as being divided down into ever smaller boxes and that's pretty much how the modelling process for this stage works.

Figure 6: Roughing out the body shape. This is the very basis of the model. I've extruded more
polygons from the original cube we started with and have begun to form the shape of the head,
body and tail. You can see I've not adjusted the Z co-ordinates at all, at this stage I'm only interested in
roughing out the form along the X and Y axes. The highlighted polygon will be where the shoulder
and front leg of the animal will be modelled.
So that's the start. Check out online tutorials for your specific modelling application for other techniques that will be of use as you progress, but remember the mesh has to be a single object, preferably made of polygons. Be thrifty in your use of polygons as we want to keep the polygon count as low as possible as they will soon mount up, and if we want to animate then lots of polygons could be problematic.
One more thing - don't move the points on any of the polygons on the X/Y axis (the sagittal plane) of the model, as this will create gaps in the symmetry later on, and you final model will have holes. Keep checking everything's in order by flicking on the symmetry and hypernurbs as you work, and correct any errors as you go along - do not leave them for later or you might get in one awful muddle.


