Here is a graphite sketch I created a couple of years ago of the Isle of Wight theropod Eotyrannus lengi, a basal tyrannosauroid known from an incomplete skeleton collected in the 1990's. I had the opportunity to see some elements of the cranial and appendicular skeleton whilst visiting the geology museum at Sandown some years ago, before the fossil was described.
On another note, it has been one whole month since I last posted. Tempus fugit. Unsurprisingly this is because it has been a very busy month and although all seems quiet, much has been happening including a trip away and a very busy time with the day job. During this month Paleo Illustrata celebrates its first birthday, and a big thank you to all who have supported me over the last year. I've been writing posts, but none are ready for publishing . . . yet.
Wednesday, 29 February 2012
Wednesday, 1 February 2012
Building a dinosaur - Triceratops takes shape
It was way back in September when I last posted about modelling a 3D Triceratops and since then there has been much yanking and tweaking of polygons, and the project has moved on (albeit rather glacially) a step or two. In that last post I talked about the technique I would be using to make the basic mesh, which was the extruding and manipulation of polygons. I chose this technique because a) It is one I use most often and b) it keeps things organised. However, after the aforementioned post Evan Boucher commented he preferred the polygon building method, where polygons are added individually to build a mesh and this too is an excellent technique; it's work checking out Evan's excellent website to see the results that can be achieved by this method.
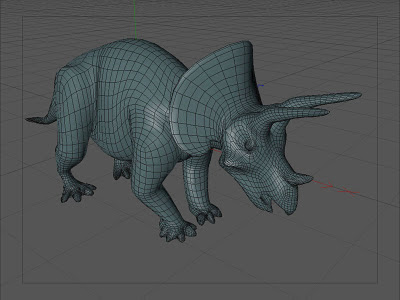
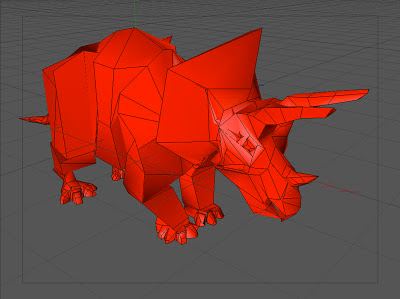
The image above shows the model as it stands now. This is made entirely out of quads, or polygons with four sides. The reason for this is it is easier to control the various polygons if things get complicated if they all have the same number of sides, plus when using hypernurbs the end mesh is smoother. Further down the pipeline when we want to add textures the model will be easier to manipulate to get the image maps in good order. Below is a breakdown of the model's structure.
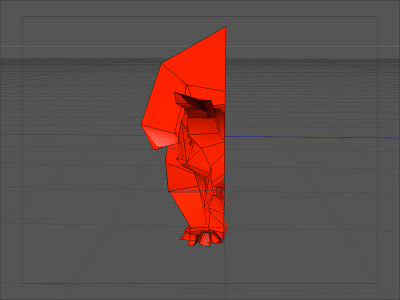
As the screen shots show, I've only modelled half of the dinosaur and this is because I will use a symmetry object to mirror the mesh and create a whole model. This saves a huge amount of modelling time but does have some drawbacks, in that you mush keep an eye on the z-co-ordinates of your sagittal plane points or the mesh will have holes, gaps or puckers along the centre, and when finalised will have problem areas that will need fixing.
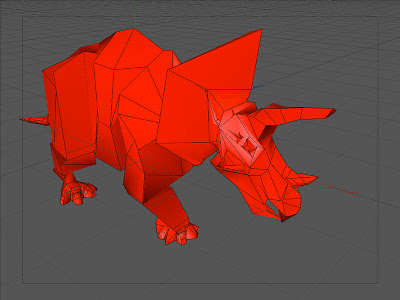
This mesh is then nested first in a symmetry object and then in a hypernurbs object. The hypernurbs object rounds the geometry in an organic fashion and each polygon, edge and point on the mesh is weighted and this weighting can be adjusted to add or reduce the objects influence, for instance the tips of the horns are virtually unweighted to make them pointed whereas the points making up the edge of the frill are left at the default settings giving them an organic curve.
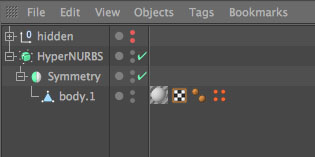
The form is roughed out and refined in stages to create the shape of the animal. This involves pushing and pulling points and polygons, constant referral to the reference and turning the hypernurbs and symmetry objects on and off to check your progress and make manipulation easier. At this stage we want to keep the polygon count as low as is possible so things don't become too confusing and it is worth getting onto the habit of making incremental saves of the project as you go along so if it does get muddled or looks wrong you can go back to a previous stage and restart.
The movie above shows a 360-degree rotation of the model at this stage. It doesn't need to be perfect at this point and should be devoid of detail, which will be added later. Of course, it needs to be as anatomically accurate as possible and any comments on this subject are most welcome.
![]() |
| The model in its latest iteration. This is a polygon mesh sitting within a symmetry object, itself sitting within a hypernurbs object. |
![]() |
| The model looking down the sagittal plane. |
As the screen shots show, I've only modelled half of the dinosaur and this is because I will use a symmetry object to mirror the mesh and create a whole model. This saves a huge amount of modelling time but does have some drawbacks, in that you mush keep an eye on the z-co-ordinates of your sagittal plane points or the mesh will have holes, gaps or puckers along the centre, and when finalised will have problem areas that will need fixing.
![]() |
| Half a dinosaur: the mesh in it's raw form. |
This mesh is then nested first in a symmetry object and then in a hypernurbs object. The hypernurbs object rounds the geometry in an organic fashion and each polygon, edge and point on the mesh is weighted and this weighting can be adjusted to add or reduce the objects influence, for instance the tips of the horns are virtually unweighted to make them pointed whereas the points making up the edge of the frill are left at the default settings giving them an organic curve.
![]() |
| The mesh nested in a symmetry object, itself nested in a hypernurbs object. |
![]() |
| The model with the symmetry object activated. |
The form is roughed out and refined in stages to create the shape of the animal. This involves pushing and pulling points and polygons, constant referral to the reference and turning the hypernurbs and symmetry objects on and off to check your progress and make manipulation easier. At this stage we want to keep the polygon count as low as is possible so things don't become too confusing and it is worth getting onto the habit of making incremental saves of the project as you go along so if it does get muddled or looks wrong you can go back to a previous stage and restart.
The movie above shows a 360-degree rotation of the model at this stage. It doesn't need to be perfect at this point and should be devoid of detail, which will be added later. Of course, it needs to be as anatomically accurate as possible and any comments on this subject are most welcome.
Friday, 27 January 2012
Palaeontology panoramas - the bigger picture
One of the best things about field work is the places visit that demonstrate the wonderful geological diversity of our planet. Each location is like an open book ready to offer up apparently infinite amounts of information to those curious enough to look closer and ask questions.
Here are three panoramas I've assembled of places I particularly enjoyed visiting and working in. These images are made up of a sequence of photographs which I've stitched together using Adobe Photoshop, which has a rather nifty filter to do just this. I have adjusted the levels a little but otherwise the images are untweaked. Click on them to see larger versions.
First up is a panorama taken in July 2010 in the badlands of Montana. This 180 degree image shows the Hell Creek in the early morning, with clover on the gumbo banks (due to an exceptionally wet spring that year) and Sagebrush scenting the air. All that, and the rocks are full of fossils. Bliss!
Next is a panorama of Barnes High on the south-west coast of the Isle of Wight. This image shows rocks of the Wealden, mainly the red, green and grey clays of the Wessex Formation with the Vectis Formation appearing at the very top on the right of the image and thickening towards the left, over the orange-coloured sandstone which forms the cap of Barnes High; this is the junction of the Wessex and Vectis formations. The famous Hypsilophodon Bed lies just beneath this sandstone and reaches the beach further to the south. It was at this location that a partial large sauropod skeleton was found and the BBC returned to many years later with Live on Dinosaur Island to try and find any remaining bones missed, a task at which they unfortunately failed, although they cornered the market in pond mussels for the duration of the dig.
Next comes a vista of part of The Valley of Fire in Nevada. We were here on a tour from Las Vegas after the SVP meeting, and although we didn't find any body fossils we did find a trackway and indulge in some neoichology. This an area of spectacular scenery and wonderful geology and if you're in the area is well worth a visit. The landscapes within the park are quite diverse and never less than breathtaking. Yes, that is a wedding in progress near the car park. We came in that big pink jeep. Hmmm.
Here are three panoramas I've assembled of places I particularly enjoyed visiting and working in. These images are made up of a sequence of photographs which I've stitched together using Adobe Photoshop, which has a rather nifty filter to do just this. I have adjusted the levels a little but otherwise the images are untweaked. Click on them to see larger versions.
First up is a panorama taken in July 2010 in the badlands of Montana. This 180 degree image shows the Hell Creek in the early morning, with clover on the gumbo banks (due to an exceptionally wet spring that year) and Sagebrush scenting the air. All that, and the rocks are full of fossils. Bliss!
![]() |
| Hot, remote and full of small, vicious bitey things but also full of luverly fossils: The Hell Creek Formation in Montana. A wonderful spot. |
Next is a panorama of Barnes High on the south-west coast of the Isle of Wight. This image shows rocks of the Wealden, mainly the red, green and grey clays of the Wessex Formation with the Vectis Formation appearing at the very top on the right of the image and thickening towards the left, over the orange-coloured sandstone which forms the cap of Barnes High; this is the junction of the Wessex and Vectis formations. The famous Hypsilophodon Bed lies just beneath this sandstone and reaches the beach further to the south. It was at this location that a partial large sauropod skeleton was found and the BBC returned to many years later with Live on Dinosaur Island to try and find any remaining bones missed, a task at which they unfortunately failed, although they cornered the market in pond mussels for the duration of the dig.
![]() |
| Here be dragons: Barnes High on the Isle of Wight, England as seen from the beach. The top looks relatively flat in this image but it's actually a bit steeper in real life. |
Next comes a vista of part of The Valley of Fire in Nevada. We were here on a tour from Las Vegas after the SVP meeting, and although we didn't find any body fossils we did find a trackway and indulge in some neoichology. This an area of spectacular scenery and wonderful geology and if you're in the area is well worth a visit. The landscapes within the park are quite diverse and never less than breathtaking. Yes, that is a wedding in progress near the car park. We came in that big pink jeep. Hmmm.
![]() |
| The Valley of Fire, Nevada. An astonishing place and only a couple of hours trip from Sin City. |
Saturday, 14 January 2012
Daft dinosaur doodles: hand-drawn
As a graphic designer I have spent a fair proportion of my working life attending meetings, talking on the phone or waiting for blue bars to crawl across my computer screen as something renders/saves/copies/uploads/downloads. Often I will doodle in my sketchbook whilst these other things are happening; it ties up those parts of my brain which might wander and leaves the rest to concentrate on the task in hand (actually, this is not true of rendering/saving/copying/uploading/downloading, when it's simply something to do). My art teacher at school was the inspiration behind this and she would produce some incredible, complex doodles during staff meetings.
Here is a selection of cartoony dinosaur doodles from the sketchbooks I've kept over the years. I make no claims as to what the heck they represent (not art, or dinosaurs I suppose) but they are certainly not anatomically accurate, but then that really doesn't matter for cartoons. Character development has always held an interest for me but working mainly in medical visualisation and motion graphics means there hasn't been a huge amount of work involving characters, so these were all invented for the simple pleasure of drawing without any imposition of style. The slight yellowish tinge in some images is from the paper in Moleskine sketchbooks which I used until recently, when I became fed up altering the scans to compensate. Ditch the yellow paper Moley makers! The blue pencil is an old school graphic designer hangover from when the cameras used to reproduce artwork couldn't see blue, although it's easy to loose in Photoshop and is great for roughing out basic shapes. Plus, I like it.
Sunday, 8 January 2012
A little green Raptoronyx
I'm now getting back into my stride after the break (which seems like an age ago), and the lack of activity on Paleo Illustrata is a consequence of the number of things I have on the go at the moment. Many of these projects will provide blog material, and I'm hoping 2012 will be a very busy year for me palaeontology-wise. There's so much to look forward too like fieldwork, the possibility of attending the next SVP and the continuing personal projects I am always busy with. I also need to earn some bunce to pay for all this!
Yesterday I was rooting around in a charity shop in town when I came across this little geezer in a box full of toys, and as he looked balefully up at me with those little green eyes he seemed to say "take me home Stu" so I liberated him from the toy box for the princely sum of 20p. I think he's supposed to be a Velociraptor but he looks rather like a Baryonyx too, so I've called him Raptoronyx. He's a tad more stylised than most toy dinosaurs and despite some rather glaring anatomical inaccuracies (the hands aren't pronated though) I rather like him, and he now lives on my desk alongside an R2D2, a Papo Stegosaurus, Morph, George from Rainbow and the monkey from the PG tips advert.
Saturday, 24 December 2011
Season's greetings
I hope you have a peaceful Christmas and a great 2012. May all your field trips be productive, your restorations accurate, your papers accepted and your prep labs busy.
Best wishes,
Stu
Monday, 19 December 2011
Paleo Illustrata: 10,000 page views - thanks!
Today Paleo Illustrata had it's 10,000th page view. A very big thank you to all following the blog, those who have linked to it and everyone who's swung by to read a post. I hope to bring much more on this man's journey into palaeontology and have lots of ideas for future posts, as swell as continuing the occasional series I occasionally get around to, er, continuing.
Subscribe to:
Posts (Atom)


